

Web shop content
TiendaContent
With the Content module you decide what your web shop shows besides the products: a home page, an “about us” page, the menu, banners and questions. The screens are under Content.
Content, Pages lists your pages with their Title, Path, Status (Published or Draft) and Shop front.
- New Page: a Title, the Path (for example
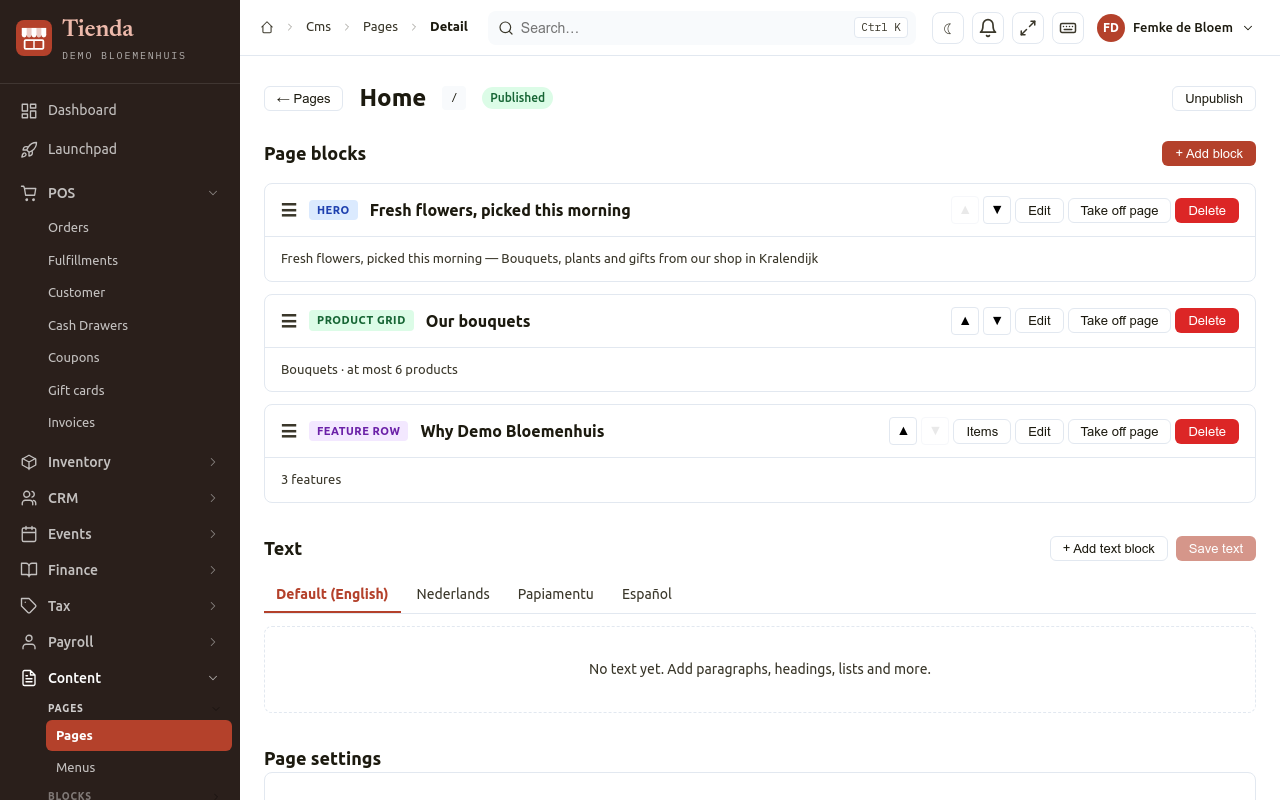
/about;/is the home page), the Title for search engines and Description for search engines, and on which shop fronts it is Visible on. Save. - Open the page. Under Page blocks, choose Add block: a hero, a product grid, a FAQ list, a banner, an image, or a text block (Add text block).
- Drag blocks to reorder them, or use Move up and Move down. Take off page removes a block from the page without deleting it.
- Choose Publish. View on shop opens it; Unpublish takes it offline.
Text is written per language; Without text in this language, visitors see the default text.
Without a page at /, the shop shows a standard home page with your shop’s name
and products.
Blocks
Section titled “Blocks”Blocks are made once and can be used on several pages. Each type has its own list under Content:
| Block | What it shows |
|---|---|
| Heros | A full-width banner at the top of a page: background image, headline, subhead and one button. |
| Rich Images | An image beside text, left or right. |
| Image Banners | A wide image with a link. |
| Collection Banners | A banner that leads to a group of products. |
| Product Grids | A grid of products, for example from one category. |
| Product Viewers | A list of products by Category, sorted by Name, Price or Most Recent, up to Max Count, with Pinned Products first. |
| FAQ Lists | Questions and answers. |
| Feature Rows | A row of short points with icons, for example “free delivery”. |
Blocks Guide explains every block and its fields.
Content, Menus: the menu at the top of your web shop.
- Open the menu (the standard one has the slug
main-nav) and choose Manage items. - Add item: a Label, and where it Goes to: a Path on this site
(
/about) or an External address. Placed under makes it a sub-item. Tick New tab to open it in a new tab. - Use Move up and Move down to order the items.
A shop front shows the menu whose slug is set under Settings, Shop Fronts.
Media library
Section titled “Media library”Content, Media Library holds the images for pages, heros and banners. Upload image, then give it a Title, an Alt text (describes the picture for visitors who cannot see it) and Tags. Used shows in how many blocks an image is used.
E-mail templates
Section titled “E-mail templates”Content, Email Templates holds the texts of the e-mails your shop sends. Add standard templates makes the standard e-mails (order confirmation, order ready, order cancelled, event ticket) in Dutch and English. Edit the Subject and the Text of the e-mail of each.
Which e-mail goes out when an order changes status is set per status under Settings, Order Statuses.
Announcements
Section titled “Announcements”Content, Announcements shows a short message to shoppers or to your staff, for example a holiday closing:
- Title, Message, and optionally a Link label and Link URL;
- Variant: Info, Success, Warning or Error;
- Audience: Shop (storefront), POS (admin) or Both;
- Starts at and Ends at.